One of our main priorities before we moved into our new home was to get our ugly, splotchy grey bedroom in shape so we could have a good place to lay our head at night. It was small and quaint with lots of light and plenty of room for our queen sized bed.
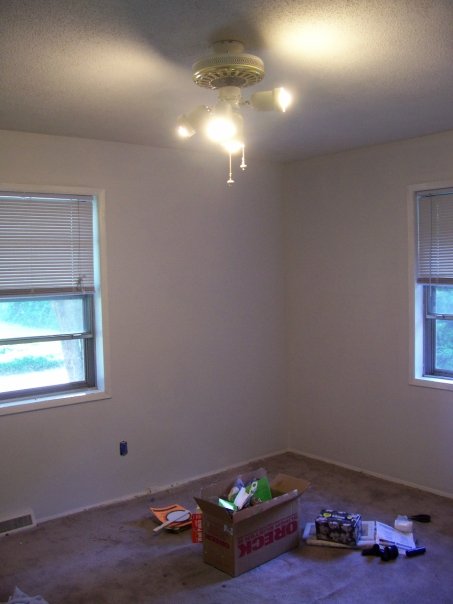
This first picture was taken when we viewed the house for the first time.

My original 'worry' of this room would be the fact that the room had a stretched out carpet and a circle outlined in the paint where I feared a tree limb had crashed through the roof and into the wall. The previous owner had the roof patched up with different colored shingles from where a tree limb had fallen and damaged the roof. I digress as I will most likely every time I talk about the previous owner and their lack of ownership when it came to taking care of this house. Upon removal of their stuff, bed namely, was a huge crack that went from the corner of the window all the way down to the floor. It runs about two and half feet across. Just another unsightly reminder of our underlying foundation issue.

So, off to Lowe's we went to pick up a few supplies for fixing up our new bedroom. Paint, brushes, buckets, joint compound, painters tape, plastic sheeting, rollers, and misc. other supplies to get our new room back into shape. We left the carpet down while we worked and started with a good patch up of all the pin

holes, cracks and gashes in the walls. Along with that, we covered all the outlets, ceiling, vents and switches with the blue tape.
After looking at the outline on the wall where I originally thought a tree limb had pushed through the wall, I discovered that they did a poor job of patching it up, had turned out to be where a head board used to be. The color of the walls was a mixture of light grey and dark grey

speckled or sponged on all over it. Not very pretty. I wish I had a close up of how disgustingly, ugly it was.
While living in our apartment still, we came to the house after work to get what we could done before we had to make the final move over to official homeowners. We pretty much had two months to get everything transferred over and fixed to livable standards.
While the compound dried and looked awesome and smooth enough to paint, we hit up the trim in a light cream with two coats. The ceiling had its coat of paint and made it look nice and white, too. Then we used primer to cover all that depressing grey and patchwork we just made. The room had been transformed. We felt a sense of great accomplishment when we painted over that last bit of greyness. It was so beautiful.

In the meantime, my head board I purchased at Office Depot was sitting in the living room awaiting its base to be made. This head board was actually a really nice hutch that was sold separately from the matching computer desk. Another customer didn't need the hutch and someone had mentioned it would make a great head board in their bedroom, but never

bought it, so I swept it up for real cheap and stuffed it into my tiny ION. I spent more money on the supplies to get the base built, but was impressed with my idea and grateful for my mom and dad's help on making it happen.
When we picked out colors for our room, it was a design element we wanted for our apartment we were moving out of. The theme was

Asian based off of my brother's two photographs he took in Korea during his first visit. Other additions to this style was the two lights we purchased at Target and the four hanging origami crane decorations I made from some similar ones we saw at a local shop in Brookside. The back wall is a darker green and the three other walls are a calm lighter green accented with the creamy white trim. We bought two sample paint tins and I tested them out and was so happy with the colors.
I was eager to get to the house straight from work and get the things we needed done.

Next, the doors of the closet came off to be painted. I believe it took three coats. I should have sanded and primed them before using the nicer paint up. The same happened with the inside of the door to the r

oom. We left the outside facing the hallway natural to go with the rest of the doors in the hallway.
The closet was no fun task either. It was dirty and dark inside there. We went with the darker green to use it up, as the one wall did not use much of the gallon at all. It makes it look bigger too.

Once we got all the paint its second coat throughout the room, we took off all the blue tape. The room was really looking pretty sharp. Our hard work was paying off.

Plug and vent covers were screwed back on and our cool new window shades installed.
Evan worked on replacing the switch on the fan to get it working.

My dad showed up for the fourth of July and helped us get some cleaning done around the house.

He also helped rip up the carpet and finish fixing that fan. We didn't know what we were doing.

Our handy new shop vac was really good at picking up our trash.

Later my Mom and Dad came back and helped fix up the head board base and lighting so the touch sensor would be reachable in bed.
Once I finished sanding and staining the base to match up with the head board, we installed it after we had moved our stuff in and started decorating.


~~VOILA!~~